‘Why,‘ you say, ‘when I can just go to that display in the grocery store where I can buy the already candied, immortal, deep-dyed red, pale yellow (we won’t talk about what that color might resemble) or poison-green kind?‘
‘Because,’ I say, ‘you heard yourself.’

Besides, the commercial chunks of citron are thick, with a taste of medicine, and they cost a vast deal for something that comes from a part of the fruit you normally discard. If you make your own peels at home, all you need are a batch of scrubbed oranges or grapefruit or lemons, (best of all a combination of all three,) plus sugar, water and the time to do it. The last often sets people aback, but remember that if you need to, you can set the partially processed peels aside in the fridge at any stage in this process except for the candying stage. Once you combine sugar syrup and peels you should complete that particular task without trying to take a break.
But don’t imagine that you need to hover! While the peels simmer you can be doing any sort of other job the holidays require, from writing holiday cards to playing Sudoku. Just use a timer and it’s all good. The house will smell amazing, too.
Home candied peels are the reason some traditional desserts used to be popular and are no more. Or worse, they’ve become jokes. Wasn’t it Elizabeth Moon who used a fruitcake trope in one of her science fiction novels–I shall have to search my shelves to check that, but I believe I’m right. Classics like fruitcake and plum pudding made with real home candied citrus reveal a fragrant, sharp citrus brilliance that isn’t even on the horizon for a dessert made with store-bought citron.
So, how do you start? Peel your citrus, trying to leave the majority of the white under-peel behind. Don’t get obsessive, you want some white, so a vegetable peeler will not work here; simply remember that the main bitterness lies in the white part, and that its texture is stodgy. Then cross cut your peels into reasonable bits– maybe one and a half inches by under a half inch. Again, not too small. You want to be able to recognize what you’re eating! Measure your amount, because this will determine later how much syrup to make. (I normally don’t bother to make less than four cups at a go.) Then bring the peels to a boil in a pot of cold water, with enough water to cover the peels by about an inch.
As soon as a boil is achieved, turn down for a five minute simmer. After that, drain, rinse and repeat the simmering process two more times. If you want less bitter you can repeat two more times for a total of five simmers, but the peels are fairly soft, so don’t overdo this part of the process.
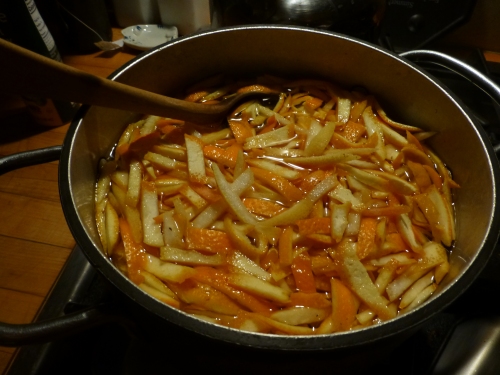
Make up a syrup of 1/2 cup white granulated sugar to 1/4 cup of water for each cup of peel, bring up to heat to dissolve the granules, then add the peels. Cook together at medium heat, stirring gently at intervals, until the syrup has almost vanished. This is the slow part of the job. Don’t let them burn, but in the early part you can leave them on a low simmer for five minutes or more at a time, between stirs. I use wooden chopsticks to lessen the risk of any metallic taste, and because it is the gentlest stir I can accomplish.
The photo below shows how the syrup is vanishing into the peels and the moisture into the air.

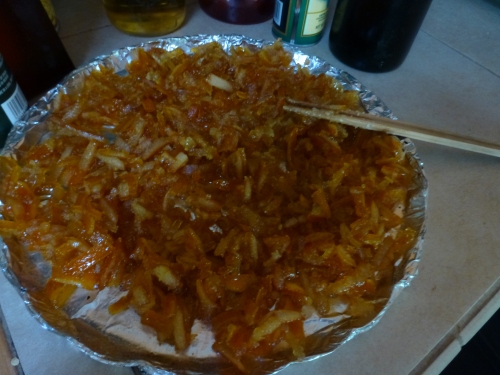
Turn out on to a pan lined with aluminium and oiled with a tasteless vegetable oil such as grape seed oil. Let cool and dry. You can leave this overnight or longer, but do not be surprised if the human residents of your household make inroads on the peels. The candy tastes rather nice, and the citrus bitter against sweet is distinctive. The product will be reasonably soft and gooey, full of flavor as you can see below. A bit mixed into the stuffing for a goose or chicken will be a good reward. Now you can use them in any cooking project that asks for candied peels or citron, or crystallized fruit.
Some folk like to try and separate out the peel pieces and dry them until they are leathery and can be dipped into chocolate. I can’t stand that much sweetness in one mouthful, but I pass on the idea in case it delights you.
If you end up on the Great British Baking Show, bring some home-candied peels along to surprise the judges, and you might actually win a round on this transformative flavor alone!